
创建自动测试套件对应用程序来说是保持程序强健的一个好方式。
Play 测试构建于 JUnit 4 和 Selenium 。
15.1. 书写测试程序
测试程序必须创建于 test/目录。当 play 运行于测试模式时,这个文件夹是唯一被增加到源路径的文件夹。你可以创建三种类型的测试。
单元测试
单元测试是用于 JUnit 写的。在这种情况下,可用于测试应用程序的模型和一些工具箱测试。
示例:
import play.test.*;
import org.junit.*;

public class MyTest extends UnitTest {

    @Test
    public void aTest() {
        assertEquals(2, 1 + 1); // 测试真正关心的地方
    }

    @Test
    public void testUsers() {
        assertEquals(3, Users.count());
    }
}
功能性测试
功能性测试是用 JUnit 写的。在这种情况下,可以通过直接访问控制器对象进行测试。
示例:
import play.test.*;
import play.mvc.*;
import play.mvc.Http.*;
import org.junit.*;

public class ApplicationTest extends FunctionalTest {

    @Test
    public void testTheHomePage() {
        Response response = GET("/");
        assertStatus(200, response);
    }
}
使用 renderArgs()方法可以直接访问传递到视图层的参数,用于代替 response 自我断言,比如:
@Test
public void testUserIsFoundAndPassedToView() {
    Response response = POST("/user/find?name=mark&dob=18011977")
    assertThat(renderArgs("user"), is(notNullValue());
    User user = (User) renderArgs("user");
    assertThat(user.name, is("mark"));
}
Selenium test 用例测试
Acceptance 认同测试是用 Selenium 写的。在这里,你可以在一个自动化的浏览器对应用程序进行测试。
Selenium 测试用 HTML 表书写,即可使用其自有语法,也可使用 #{selenium /} 标签。
示例:
#{selenium 'Test security'}

    //试着登录到超级用户区域
    clearSession()
    open('/admin')
    assertTextPresent('Login')
    type('login', 'admin')
    type('password', 'secret')
    clickAndWait('signin')

    //验证用户是否已经正常登录
    assertText('success', 'Welcom admin!')

#{/selenium}
因为 Selenium 测试运行于浏览器内, 要想访问模拟邮件和放入 play 缓存的字符串值,就必须使用 Selenium 扩展。
下面示例用于访问发送到指定帐号的最新邮件:
#{selenium 'Test email sending'}

    // Open email form and send an email to boron@localhost
    open('/sendEmail')
    assertTextPresent('Email form')
    type('To', 'boron@localhost')
    type('Subject', 'Berillium Subject')
    clickAndWait('send')

    // Extract the last email sent to boron@localhost into a JavaScript
    // variable called email
    storeLastReceivedEmailBy('boron@localhost', 'email')

    // Extract the subject line from the email variable into a variable
    // called subject
    store('javascript{/Subject:\s+(.*)/.exec(storedVars["email"])[1]}', 'subject')

    // Test the contents of the subject variable
    assertEquals('Berillium Subject', '$[subject]')

#{/selenium}
下面的示例访问一个存储在 play Cache 的字符串:
#{selenium 'Get string from cache'}

    open('/register')

    assertTextPresent('Registration form')

    type('Email', 'my@email.com')

    type('Password', 'secretpass')

    type('Password2', 'secretpass')

    // .. Fill in the registration form ..

    // Get the value of the magicKey variable from the cache

    // (set to the CAPTCHA answer in the application)

    storeCacheEntry('magicKey', 'captchaAnswer')

    // Type it into the form

    type('Answer', '$[captchaAnswer]')

    clickAndWait('register')

#{/selenium}
15.2. Fixtures 固定值
当运行测试时,需要为应用程序准备一些可用的数据。这里有一个非常简单的方式来实现每次测试时重新设置数据库。
play.test.Fixtures 类用于帮助维护数据库并注入测试数据。在 JUint 测试方法里特定使用@Before 注释。
@Before
public void setUp() {
    Fixtures.deleteAll();
}
为了能导入数据,可以在 YAML 文件里进行定义,然后使用 Fixtures 帮助类自动导入。
# Test data

Company(google):
   name:    Google

Company(zen):
   name:    Zenexity

User(guillaume):
   name:    guillaume
   company: zen
然后:
@Before
public void setUp() {
    Fixtures.deleteAll();
    Fixtures.loadModels("data.yml");
}
了解 YAML manual page。
对 Selenium 测试来说,可以使用#{fixture /} 标签:
#{fixture delete:'all', load:'data.yml' /}

#{selenium}

    // Write your test here

#{/selenium}
有时为了方便, 可以把分割的数据放入不同的 YAML文件中, 并一次性用fixtures进行加载:
Fixtures.loadModels("users.yml", "roles.yml", "permissions.yml");
and for Selenium tests:
#{fixture delete:'all', load:['users.yml', 'roles.yml','permissions.yml'] /}
15.3. 运行测试
使用 play 命令,如下:
# play test myApp
在这种模式下, Play 将自动加载 test-runner 模块,此模块提供了一个基于 web的测试运行,通过 http://localhost:9000/@tests URL 进行访问。
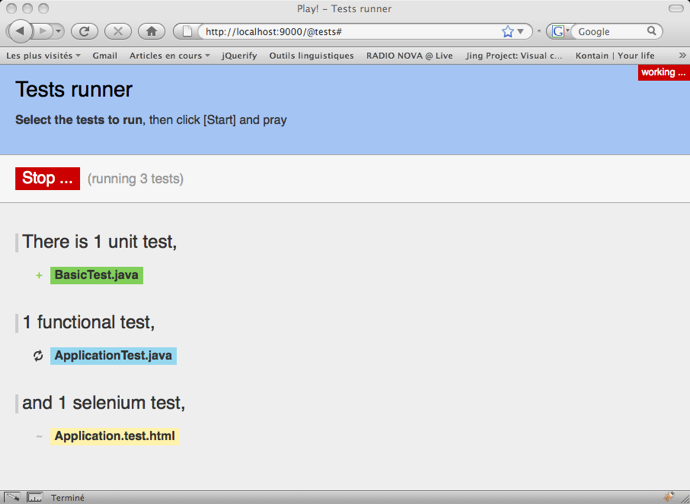
当运行测试的时候,其结果将会存储在/test-result 目录里。
在测试运行页面上,每个测试都是一个链接。右键》打开到新标签可以直接在外部运行测试。
当用这种方式运行测试时,play 将启动特定的 test framework ID,因此你可以在 application.conf 里定义特定的配置。
如果打算设置多个不同的测试配置,你可以使用 framework IDs 匹配 test-?.*(e.g: test-special)来实现。
如果使用了其他的 framework ID 作为默认的 test 框架,你必须确定所有在application.conf 里的 test 配置对 framework ID 来说都是可用的。当加载特定的 framework ID 进行测试时,命令应该为:
play test --%test-your-special-id
比如:
%test.db=mem
%test.jpa.ddl=create-drop
15.4. 陆续集成,并自动运行测试
auto-test 命令和 test 命令做的是同一件事,只是 auto-test 会自动加载浏览器,运行所有的测试并停止。
如果你打算设置一个 continuous integration system 陆续集成系统的话,这是一个很有用的命令。
开始运行后,所有的结果都存储在/test-result 目录下。此外,这个目录为测试组件的最终结果创建了标志文件 (either result.failed or result.passed) 。最后,这个目录下的 application.log 文件包含了所有的日志。
为了设置一个 continuous integration system 持续集成系统,其步骤如下:
- 检查最后一个版本的应用程序
- 运行 play auto-test
- 等待处理结束
- 检查/test-result 目录下的标志文件 result.passed 或 result.failed
在 CRON tab 里运行这些步骤就完成了~!
通过配置 headlessBrowser,可以改变浏览器兼容模式。
