
Play 的源码一般在 framework\src 目录下面。Java 文件的编译在 play.classloading.ApplicationClassloader 类中实现,模板的编译在 play.templates.TemplateLoader 类中实现。修改这两个文件就可以实现 Java 文件和模板文件的增量编译。
这里以 play 1.4.5 为例。
一、思路
- 个 play 项目,将 play 源码中需要修改的文件复制到项目中。
- 用 IDEA 打开项目,修改文件,让它们支持增量编译。
- 然后在 IDEA 中进行编译,得到 class 文件。
- 最后用编译好的 class 文件,替换 play 安装目录的 framework/play-1.4.5.jar 文件中对应的 class 文件。
注:jar 文件其实就是一个 zip 文件,使用压缩软件就可以对其进行修改,添加新文件或覆盖已有的文件。
二、新建项目
使用命令新建一个 play 项目:
play new play-1.4.5
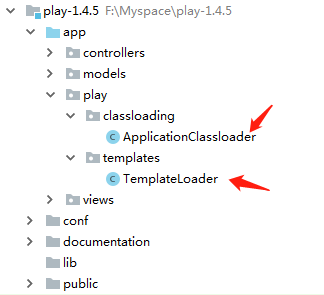
将 play 源码中的 ApplicationClassloader.java 和 TemplateLoader.java 文件复制到 app 目录中的对应路径:
三、修改源码
1、Java 文件的增量编译
主要修改 play.classloading.ApplicationClassloader.getAllClasses() 方法。
1)获取文件最后一次的编译时间
先添加一个方法,用于获取类的最后一次编译时间:
/**
 * 根据名称,获取文件最后一次编译时间
 *
 * @param name
 * @return
 */
private long getCompiledTime(String name) {
    File file = Play.getFile("precompiled/java/" + name.replace(".", "/") + ".class");
    if (!file.exists()) {
        return 0L;
    }

    return file.lastModified();
}
2)修改编译条件
进入 getAllClasses() 方法,找到以下代码:
if (applicationClass != null && !applicationClass.compiled && applicationClass.isClass()) {
    classNames.add(applicationClass.name);
}
修改这个条件:
if (getCompiledTime(applicationClass.name) < applicationClass.javaFile.lastModified()) {
    classNames.add(applicationClass.name);
}
classNames 是需要编译的文件的列表。上面的条件表示,只将修改过的文件添加到这个列表中。
3)只编译修改过的文件
在 getAllClasses() 方法中,找到以下代码:
for (ApplicationClass applicationClass : Play.classes.all()) {
    Class clazz = loadApplicationClass(applicationClass.name);
    if (clazz != null) {
        result.add(clazz);
    }
}
修改成如下:
// 保存原始数据
boolean oldValue = Play.usePrecompiled;
for (ApplicationClass applicationClass : Play.classes.all()) {
    // 只预编译修改过的文件
    Play.usePrecompiled = !classNames.contains(applicationClass.name);
    Class clazz = loadApplicationClass(applicationClass.name);
    if (clazz != null) {
        result.add(clazz);
    }
}
Play.usePrecompiled = oldValue;
其中添加了 3 行代码。第1行和第3行是为了保存 Play.usePrecompiled 原始值,第2行的意思是,将不再 classNames 中的类标记为已编译,即不参与 loadApplicationClass() 方法中的编译过程。
还有一步不能忘了!!!
classNames 变量的定义要提到外面一层来,因为 loadApplicationClass() 方法是在 classNames.add 代码的外面一层。
下面给出一段较为完整的代码:
List<String> classNames = new ArrayList<>();
if (!Play.pluginCollection.compileSources()) {

    List<ApplicationClass> all = new ArrayList<>();

    for (VirtualFile virtualFile : Play.javaPath) {
        all.addAll(getAllClasses(virtualFile));
    }

    for (ApplicationClass applicationClass : all) {
        if (getCompiledTime(applicationClass.name) < applicationClass.javaFile.lastModified()) {
            classNames.add(applicationClass.name);
        }
    }

    StopWatch watch = new StopWatch();
    watch.start();
    Logger.info("[ java ] compile %d java files", classNames.size());
    Play.classes.compiler.compile(classNames.toArray(new String[classNames.size()]));
    watch.stop();
    Logger.info("[ java ] compile finished! used %d ms", watch.getTime());
}

// 保存原始数据
boolean oldValue = Play.usePrecompiled;
for (ApplicationClass applicationClass : Play.classes.all()) {
    // 只预编译修改过的文件
    Play.usePrecompiled = !classNames.contains(applicationClass.name);
    Class clazz = loadApplicationClass(applicationClass.name);
    if (clazz != null) {
        result.add(clazz);
    }
}
Play.usePrecompiled = oldValue;

Collections.sort(result, new Comparator<Class>() {

    @Override
    public int compare(Class o1, Class o2) {
        return o1.getName().compareTo(o2.getName());
    }
});
4)计算编译消耗的时间
找到执行编译的代码:
Play.classes.compiler.compile(classNames.toArray(new String[classNames.size()]));
计算编译的耗时:
StopWatch watch = new StopWatch();
watch.start();
Logger.info("[ java ] compile %d java files", classNames.size());
Play.classes.compiler.compile(classNames.toArray(new String[classNames.size()]));
watch.stop();
Logger.info("[ java ] compile finished! used %d ms", watch.getTime());
2、模板文件的增量编译
主要修改 play.templates.TemplateLoader.scan() 方法。
1)获取文件最后一次的编译时间
先添加一个方法,用于获取类的最后一次编译时间:
/**
 * 根据名称,获取文件最后一次编译时间
 *
 * @param name
 * @return
 */
private static long getCompiledTime(String name) {
    if(name.indexOf("/") != 0) name = "/" + name;
    String filename = "precompiled/templates" + name;
    File file = Play.getFile(filename);
    if (file == null) return 0L;
    return file.lastModified();
}
2)修改编译条件,只编译修改过的文件
进入 scan() 方法,编译模板文件的代码:
Template template = load(current);
if (template != null) {
    try {
        template.compile();
        if (Logger.isTraceEnabled()) {
            Logger.trace("%sms to load %s", System.currentTimeMillis() - start, current.getName());
        }
    } catch (TemplateCompilationException e) {
        Logger.error("Template %s does not compile at line %d", e.getTemplate().name, e.getLineNumber());
        throw e;
    }
    templates.add(template);
}
在这段代码的外层添加一个条件:
// 计算模板文件名
String name = current.relativePath().replaceAll("\\{(.*)\\}", "from_$1").replace(":", "_").replace("..", "parent");

// 只编译修改过的文件
long lastModified =  getCompiledTime(name);
if ( lastModified < current.lastModified()) {
    // 打印正在编译的文件名
    Logger.info("[ template ] compile %s", name);
    Template template = load(current);
    if (template != null) {
        try {
            template.compile();
            if (Logger.isTraceEnabled()) {
                Logger.trace("%sms to load %s", System.currentTimeMillis() - start, current.getName());
            }
        } catch (TemplateCompilationException e) {
            Logger.error("Template %s does not compile at line %d", e.getTemplate().name, e.getLineNumber());
            throw e;
        }
        templates.add(template);
    }
}
3)计算编译消耗的时间
进入 getAllTemplate() 方法,找到 scan() 方法的循环代码:
for (VirtualFile virtualFile : Play.templatesPath) {
    scan(res, virtualFile);
}
在其中添加耗时计算代码:
// 用于计算编译时间
StopWatch watch = new StopWatch();
Logger.info("[ template ] compile template files");
for (VirtualFile virtualFile : Play.templatesPath) {
    Logger.info("[ template ] scan %s", virtualFile.getRealFile().getAbsolutePath());
    watch.reset();
    watch.start();
    scan(res, virtualFile);
    watch.stop();
    Logger.info("[ template ] compile finished! used %s ms", watch.getTime());
}
Logger.info("[ template ] compiled template files");
四、编译项目
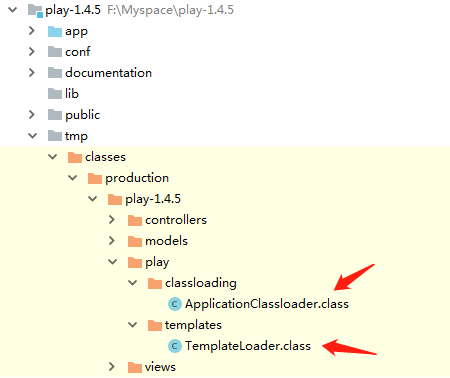
在 IDEA 中编译项目,编译后的文件在 tmp 目录中:
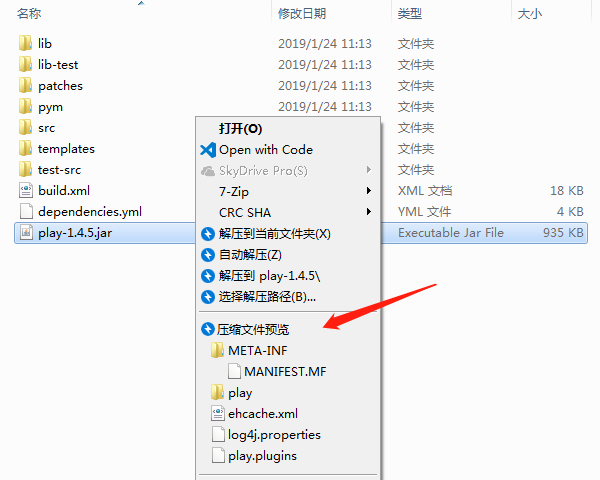
五、修改 play 的 jar 包
用 修改 play 安装目录的 framework/play-1.4.5.jar
这里以 Bandizip 压缩工具为例。
右键点击 play-1.4.5.jar 文件,选择“压缩文件预览”:
在打开的窗口中先进入 play/classloading 目录,点击“添加”按钮:
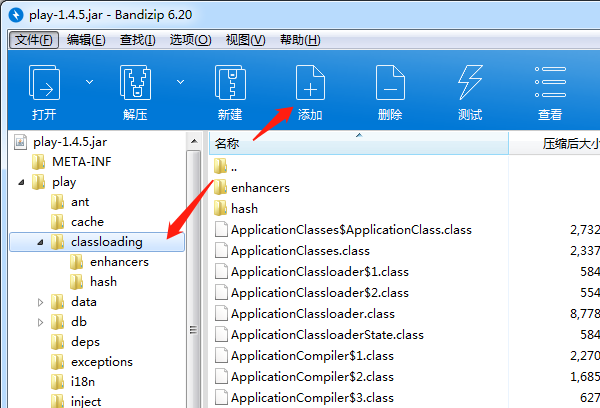
根据提示选择在 IDEA 中编译好的,以“ApplicationClassloader”开头的 3 个 class 文件,覆盖 jar 包中对应的 3 个文件。
按照此方法再覆盖 play/templates 目录下的 TemplateLoader.class 文件。
然后关闭窗口,完成 jar 文件的修改。
六、禁止删除 precompiled 目录
本方案采用比较待编译的文件与 precompiled 目录下对应的已编译文件的修改时间,来判断是否需要编译。而 play 1.4.5 在执行 play precompile 命令时会首先删除 precompiled 目录,这会导致增量编译无法实现。所以要用删除 precompiled 目录的代码。
打开 play 下面的 framework/pym/play/commands/precomplie.py 文件,注释以下代码:
#    if os.path.exists(os.path.join(app.path, 'precompiled')):
#        shutil.rmtree(os.path.join(app.path, 'precompiled'))
到这里就可以正常使用增量编译的功能了。只要像平常一样使用简单 play precompile 命令即可,它会只编译修改过的 java 文件和模板文件:
$ play precompile
~        _            _
~  _ __ | | __ _ _  _| |
~ | '_ \| |/ _' | || |_|
~ |  __/|_|\____|\__ (_)
~ |_|            |__/
~
~ play! 1.4.5, https://www.playframework.com
~
~ using java version "1.8.0_181"
Listening for transport dt_socket at address: 8000
11:32:53,551 INFO  ~ Starting F:\Myspace\play-1.4.5
11:32:53,624 INFO  ~ Precompiling ...
11:32:53,629 INFO  ~ [ java ] compile 2 java files
11:32:54,197 INFO  ~ [ java ] compile finished! used 569 ms
11:32:54,412 INFO  ~ [ template ] compile template files
11:32:54,413 INFO  ~ [ template ] scan F:\Myspace\play-1.4.5\app\views
11:32:54,415 INFO  ~ [ template ] compile /app/views/Application/index.html
11:32:54,896 INFO  ~ [ template ] compile finished! used 483 ms
11:32:54,896 INFO  ~ [ template ] scan D:\play\play-1.4.5\framework\templates
11:32:54,900 INFO  ~ [ template ] compile finished! used 4 ms
11:32:54,901 INFO  ~ [ template ] compiled template files
11:32:54,919 INFO  ~ Done.
上面的日志显示,有 2 个 java 文件被编译,有一个“/app/views/Application/index.html”的模板文件被编译。
附录
最后,提供修改后的源码和 play-1.4.5.jar。
